Sunday, October 01, 2006

Finally the blog is back again and this is the new address

www.appsdbablog.com

RSS feed URL

http://appsdbablog.com/atom.xml

There are still some tweaks that i doing on this blog, like the email subscriptions are yet to be made up.

In case you find some changes that are missing or don’t like just drop in a comment, I will surly work on that.

Thanks for patience.

Note i will not be posting on this site(appstech-sam.blogspot.com) again.

Thursday, September 28, 2006

Update

Last few days I have been busy trying to get a new location for my blog, The feedback and the response to this blog has been overwhelming and I thank you , the readers for that.

The good news is I have a new fresh, cleaner and a sleek looking blog coming up. Now I am in the process of transferring the old entries to their new home. I am working hard to get it released this weekend so please bear with me for a little while more.

Also my sincere apologies to Yury Atul Fadi among others who have left their feedback but I was unable to respond to. I promise to be back soon.

Sam

Monday, September 25, 2006

Upgrading JDK to 1.5 and configuring Jconsole.

In my earlier post i had talked about JVMs in Oracle Applications. Also i had mentioned about the jconsole tool that could be used for real time monitoring of your middle tier JVM usage.

The latest certified version of JDK supported with Oracle Applications is JDK 1.5. The version of JDK that is shipped with 11.5.10.2 is JDK 1.4.

Oracle recommends you to upgrade your JDK to 1.5 and one of the advantages of going for this upgrade is the ability to use Jconsole.

In my current i am detailing out step by step instructions for upgrading your middle tier JDK from 1.4 to 1.5 and the configuring jconsole for a real time monitoring of your JVM.


Upgrading JDK to 1.5

Downloading JDK 1.5

At the start you would require to get the J2SE1.5 software from the sun site

http://java.sun.com/j2se/1.5.0/download.jsp

Choose the J2SE 1.5 update 8 rpm file for Linux the file would be in the form of *.rpm.bin

Installing JDK 1.5

You must install the J2SE1.5 software on all the application middle tier nodes.

After you have FTPed the file to you application server change the permissions and execute the .bin file as the root user

# chmod 755 jdk-1_5_0_08-linux-i586-rpm.bin
# ./jdk-1_5_0_08-linux-i586-rpm.bin

This will present you with a binary license agreement agreeing to which will do the rpm installation for you.

Do you agree to the above license terms? [yes or no]
yes
Unpacking...
Checksumming...
0
0
Extracting...
UnZipSFX 5.42 of 14 January 2001, by Info-ZIP (Zip-Bugs@lists.wku.edu).
inflating: jdk-1_5_0_08-linux-i586.rpm
Preparing... ########################################### [100%]
1:jdk ########################################### [100%]

Done.

Make a note of the J2SE installation directory which i refer as JDK50_TOP, in my case it was /usr/java/jdk1.5.0_08.

Verify the java version

Verify the version of java installed

# ./java -version
java version "1.5.0_08"
Java(TM) 2 Runtime Environment, Standard Edition (build 1.5.0_08-b03)
Java HotSpot(TM) Server VM (build 1.5.0_08-b03, mixed mode)

The following steps are to be performed as the applications user.

Apply Inter operability patches

Apply the following Oracle Applications 11.5.10.2 J2SE1.5 inter operability patches using adpatch.

Patch 4372996
Patch 5372210

I did a shutdown of my application tier process before applying these.

$ adstpall.sh apps/apps
$ cd 4372996
$ adpatch options=hotpatch

Note: In case you have not applied the CU2 that is you are not on 11.5.10.2 you must apply TXK AutoConfig Template Rollup
patch 4367673.


Execute the J2SE 5.0 Upgrade Script to Update Configuration Files

$ txkrun.pl -script=SetJDKCfg -contextfile=$CONTEXT_FILE -runautoconfig=Yes -appspass=apps -jdktop=/usr/java/jdk1.5.0_08

This will update you configuration files and run autoconfig at the end.

Verifying java on the application tiers

Execute the applications environment script again and check the JAVA in path

$ . ./APPSORA.env
$ which java
/usr/java/jdk1.5.0_08/bin/java

Testing Applications

Navigate to the following page

http://[yourhost.domain]:[port]/OA_HTML/jsp/fnd/aoljtest.jsp


this will prompt you for your apps user, password, hostname and port. After the test is complete verify the following files are in the new JDK1.5 home.

/usr/java/jdk1.5.0_08/lib/dt.jar
/usr/java/jdk1.5.0_08/lib/tools.jar
/usr/java/jdk1.5.0_08/jre/lib/rt.jar
/usr/java/jdk1.5.0_08/jre/lib/charsets.jar

Verify adovars.env file on your application tier.

$APPL_TOP/admin/adovars.env

Check the new JDK1.5 home has been updated.

OA_JRE_TOP="/usr/java/jdk1.5.0_08"
export OA_JRE_TOP

AF_JRE_TOP="/usr/java/jdk1.5.0_08"
export AF_JRE_TOP

CLASSPATH="/usr/java/jdk1.5.0_08/jre/lib/rt.jar:/usr/java/jdk1.5.0_08/lib/dt.jar:/usr/java/jdk1.5.0_08/lib/tools.jar:/usr/jav
a/jdk1.5.0_08/jre/lib/charsets.jar:/u05/sam/applsam/samcomn/java/appsborg2.zip:/u05/sam/applsam/samora/8.0.6/forms60/java:/u0
5/sam/applsam/samcomn/java"
export CLASSPATH

AF_CLASSPATH="/usr/java/jdk1.5.0_08/jre/lib/rt.jar:/usr/java/jdk1.5.0_08/lib/dt.jar:/usr/java/jdk1.5.0_08/lib/tools.jar:/usr/
java/jdk1.5.0_08/jre/lib/charsets.jar:/u05/sam/applsam/samcomn/java/appsborg2.zip:/u05/sam/applsam/samora/8.0.6/forms60/java:
/u05/sam/applsam/samcomn/java"
export AF_CLASSPATH

Additional Check.

You can log into Oracle Applications as the sysadmin user and run a concurrent request and view the output to check the working of applications.


Configuring JCONSOLE
The jconsole executable comes within your jdk 1.5 software.You can either run it from the application middle tier server itself or connect remotely. In our case we will configure jconsole to run from the application tier server itself.

You would need to have the following two parameters in your jserv.properties file

wrapper.bin.parameters=-Dcom.sun.management.jmxremote
wrapper.bin.parameters=-Dcom.sun.management.jmxremote.ssl=false
Adding Parameters To The Custom Template File
Since the seeded autoconfig template files do not have these parameters you have to create a custom template file to intoduce these additional parameters

First you have to find out the template file corresponding to the jserv.properties file.
You could do this by running the adtmplreport.sh script at $AD_TOP/bin

$AD_TOP/bin/adtmplreport.sh contextfile=$CONTEXT_FILE target=/u05/sam/applsam/samora/iAS/Apache/Jserv/etc/jserv.properties

TEMPLATE FILE : /u05/sam/applsam/samappl/fnd/11.5.0/admin/template/jserv_ux_ias1022.properties
TARGET FILE : /u05/sam/applsam/samora/iAS/Apache/Jserv/etc/jserv.properties

Create a directory for your template file.

mkdir $FND_TOP/admin/template/custom

Copy the existing template file here

cd $FND_TOP/admin/template/custom
cp - i /u05/sam/applsam/samappl/fnd/11.5.0/admin/template/jserv_ux_ias1022.properties

.

edit this template file and introduce the following line here

wrapper.bin.parameters=-Dcom.sun.management.jmxremote
wrapper.bin.parameters=-Dcom.sun.management.jmxremote.ssl=false

Check the custom template file
Check that the custom template file is OK by running the
$AD_TOP/bin
adchkcfg.sh contextfile= appspass=
adchkcfg.sh contextfile=$CONTEXT_FILE appspass=apps

Run autoconfig and verify in the values have been written into the jserv.properties.

Restart you Oracle application tier services

$ cd $COMMON_TOP/admin/scripts/[context_name]/adstpall.sh apps/apps
$ cd $COMMON_TOP/admin/scripts/[context_name]/adstrtal.sh apps/apps

You can now launch jconsole from JDK50_TOP/bin

$ ./jconsole


As you see the configuration take place automatically when you launch jconsole from the application server itself.You just need to click on connect.


The first screen shows you a sumary of the JVM usage and garbage collection.


The next screen is more fun, this show you the real time JVM usage in a graphical format.


References
Using J2SE Version 5.0 with Oracle E-Business Suite 11i Note:304099.1Using AutoConfig to Manage System Configurations with Oracle Applications 11i Note:165195.1
Using Jconsole with Apps 11i by Steven Chan

Version Information
Oracle Applications:11.5.10.2
JDK:1.5
OS: Redhat Linux AS 4

Thursday, September 21, 2006

Installing Oracle Applications 11.5.10.2 on Linux AS 4

In today’s post i will describe the steps to install oracle Application on linux. This is a simple single node installation.

Conventions
# prompt refers to my root prompt.
$ prompt refer to my user account prompts.
All OS commands are in italics as usual.

Verify OS version

The fist step would be however to verify your Linux installation. You could check the version of the Linux installed by the
command

# cat /etc/redhat-release
Red Hat Enterprise Linux AS release 4 (Nahant Update 2)

Operating System utilities Check

Perl Software

You must have perl 5.0053 or higher installed to be able to create the staging area using the perl script adautostg.pl

Java Requirement

On 11.5.10, Rapidwiz, installs the J2SE 1.4.2 automatically for systems running on Sun Solaris, Linux, or Windows Operating Systems.

Additional Patches

For Redhat linux 4 you must apply patch 4198954

This will installt the OS packages

compat-oracle-rhel4-1.0-5.i386.rpm
compat-libcwait-2.1-1.i386.rpm

Create directories to hold your Oracle Applications

# mkdir sam
# ls -l
total 24
drwx------ 2 root root 16384 Aug 30 14:41 lost+found
drwxr-xr-x 2 root root 4096 Sep 21 11:55 sam
# chmod -R 777 sam

I am following a unix multi user installation so you need to create two OS user accounts,orasam for the database and applsam for the applications.

# useradd -g dba -d /u05/sam/orasam orasam
# useradd -g dba -d /u05/sam/applsam applsam

Xhost client settings

If you are installing using a Remote XServer you may need execute the following command

# xhost +
access control disabled,clients can connect from any host

Set umask 022 for both the user accounts

Setting umask to 022 ensures that group and others have read and execute permissions,
but not write permission.

# su - orasam
$ vi .bash_profile
add the line at the end
umask 002

# su - applsam
$ vi .bash_profile
add the line at the end
umask 002

Modify the orainventory for your new installation

# vi /etc/oraInst.loc

inventory_loc=/u05/sam/oraInventory
inst_group=dba

Set the LD_ASSUME_KERNEL parameter for both the user accounts orasam
and applsam

# su - orasam
$ vi .bash_profile
add the lines at the end
LD_ASSUME_KERNEL=2.4.19
export LD_ASSUME_KERNEL

# su - applsam
$ vi .bash_profile
add the lines at the end
LD_ASSUME_KERNEL=2.4.19
export LD_ASSUME_KERNEL

Starting the installation

You start the installation as the root user by running the rapidwiz executable from

# cd /u02/stage11i102/startCD/Disk1/rapidwiz
# ./rapidwiz


The first which you see screen is the rapid install welcome screen.


In the next screen you see,It presents you with choices either to do a fresh installation or perform an upgrade of an existing instance, I choose the first oiption.


In case you have a configuration file you can browse and choose the file here. This option is useful while doing multi node installation. Since this is a fresh install I choose NO.


The next screen is used to decide if you wish to do a single node or a multi node installation, we chose a single node installation here.


In this screen you sepcify your database OS user account and its base directory.


The following screen prompts to choose the kind of licensing we wish to have for our e business suite (in case of Vision installations you will not see this screen)


This screen is used to choose the country specific functionalities or localizations which might be required.


The next screen is used to select any additional language which we might want to install with ebusiness suite. You must have staged the appropriate language CD before selecting the language.


You must now select the character set for your database and applications, I used UTF8 to allow me to add additional languages in the future.


In this screen you specify your OS application user account and the base directory for it. You can click on advanced to further edit the directory structure.


Now you specify your domain name, and port pool. Your port pool is used to assign the ports for your various oracle application process without causing a conflict


You can specify a location to save the configuration information you have entered so far. In case of a multi node installation this config file is used to do the installation on the other nodes.


The installer will now perform a check for all the OS utilities disk space permissions port availability and display the results.


You will be prompted to start the installation of oracle applications in the next screen.


After the installation is completed a post installation sheck will be done to ensure that all the services are working as desired.

The installtion described above was single node installation of PROD instance of Oracle Applications on a Linux environment.

Wednesday, September 20, 2006

Multi Node to Single Node Cloning

With Oracle Applications 11.5.10 the ability to clone from a multi node to a single node system using rapid clone has now been certified.

This is accomplished by the Shared APPL_TOP and Merging APPL_TOP features.

In this post i am listing out the steps to perform a multi note to a single node cloning from scratch. The information mentioned here is the steps which i have used and found them to be successful for a more elaborate explanation you might want to refer to the metalink note Sharing the Application Tier File System in Oracle E-Business Suite 11i (233428.1)

Source System here refers to the multi node system to be cloned
Target System refers to the newly to be created single node system
Applications Version 11.5.10
Operating System Linux ES 4

The following Steps are required to be performed on the source system

1. Apply application tier patches using adpatch

Apply patch 4038964
Apply patch 4175764

Both the above patches are include in the consolidated update 2 or CU2 so in case you are on 11.5.10.2 or later you can ignore this step.

2. Maintain snapshot information

Log in as the applications user on each application tier node and run 'Maintain Snapshot Information' by using adadmin.

3. Merge existing APPL_TOPs

Log in to the primary node of your application tier as the application user user and run:

$ cd [COMMON_TOP]/admin/scripts/[CONTEXT_NAME]
$ perl adpreclone.pl appsTier merge

This will prompt you with option to merge secondary nodes

Now log in as the applications user to each of the secondary application tier nodes being merged and run:

$ cd [COMMON_TOP]/admin/scripts/[CONTEXT_NAME]
$ perl adpreclone.pl appltop merge

4. Prepare the source system database tier.

Log on to the database tier of the source system as the oracle user and run the following commands:

$ cd [RDBMS ORACLE_HOME]/appsutil/scripts/[CONTEXT_NAME]
$ perl adpreclone.pl dbTier

With this all the pre clone tasks on the source system have been completed.

The next set of tasks are required to be carried out on the target system that is the system on which you wish to place the merged single node instance.

1. Create OS user accounts

Create a OS user account for your applications

$ useradd -g dba -d [home_directory] -p password username

Similarly create a OS user account for your database

2. Modify the orainventory to reflect the new location

$ vi /etc/oraInst.loc

3. Copy the following application tier directories

Copy the following application tier directories from the primary node of your source system to the target application tier node, retaining the original directory structure:

– [APPL_TOP]
– [OA_HTML]
– [OA_JAVA]
– [COMMON_TOP/util]
– [COMMON_TOP/clone>
– [806 ORACLE_HOME]
– [iAS ORACLE_HOME]


4. Copy the required files for merging

Log in as the applications user to each of the secondary source nodes and recursively copy:

directory [COMMON_TOP]/clone/appl
- to -
directory [COMMMON_TOP]/clone/appl on the target system node

Before proceeding with the next steps you must shutdown your oracle applications services and the database on the source system

5. Copy the database tier file system

Log on to the source system as the database user

Copy the database (DBF) files from the source to the target system
Copy the source database ORACLE_HOME to the target system

After this you can now startup the database and applications services on your source system and release it for use.

6. Configure the target system database server


Log on to the target system as the database user and type the following commands to configure and start the database:

$ cd [RDBMS ORACLE_HOME]/appsutil/clone/bin
$ perl adcfgclone.pl dbTier

This will prompt for new ORACLE_SID,ORACLE_HOME,Port Pool,JAVA_TOP and DATA_TOP give the appropriate values matching your target system

Once successful this should start your database and listener

7. Configure the application tier server nodes

The database and its listener should remain up before executing the next set of commands.
Log in to the merged APPL_TOP node as the applications user and execute the following commands:

$ cd [COMMON_TOP]/clone/bin
$ perl adcfgclone.pl appsTier

This will prompt you new port pool for applictaion tier services as well as new APPLTOP,COMMON_TOP,ORACLE_HOME and IAS_TOP

Successful completion of this task will bring up your application tier services on the target or the cloned node.

8. Post Clone Tasks

Log in to the target system application tier node as the APPLMGR user.
Run the following tasks in adadmin for all products:
o generate JAR files
o generate message files
o relink executables
o copy files to destination


9. Clean up of the target system

Remove the temporary directory [COMMON_TOP]/clone/appl to reduce disk space usage.

Note: The version of Oracle Applications used is 11.5.10 and the operating system is Linux ES 4

Thursday, September 14, 2006

JVM

JVM or the Java Virtual Machine in Oracle Applications is the core where all java requests are handled. These request can be generated either from the self service web application page, from the Oracle Applications manager console or through a java based concurrent request.

The default version of JDK that comes with the latest release of Applications 11.5.10.2 is JDK 1.4.2, although JDK 1.5 has also been certified with 11.5.10 now.

The mod_jserv component of the Oracle Applications Server is responsible for processing all java requests.

The mod_jserv automatically creates a JVM during the startup of Oracle HTTP server (OHS),this JVM will handle all the servlets coming from within a browser.This is done using $IAS_ORACLE_HOME/Apache/Apache/bin/java.sh file.

mod_jserv uses the Apache JServ Protocol (AJP) to communicate between the HTTPD process and the JVM for processing the Java requests.

The jserv.conf file and the jserv.properties file control the behavior of the mod_jserv process and the JVM.

Some of the significant parameters which influence jservr performance are

The ApJServManual parameter in the jserv.conf file is used here to specify if the JVM will be allocated automatically at the startup of the OHS.

The wrapper.bin.parameters=-verbose:gc –Xmx2048M -Xms128M -XX:MaxPermSize=128M -XX:NewRatio=2 -XX:+PrintGCTimeStamps -XX:+UseTLAB in the jserv.properties

Verbose:gc means JVM is configured to print output when garbage collector runs
–Xmx2048M specifies the maximum memory heap size
-Xms128M specifies the minimum amount of memory required

According to Oracle, we can increase the maximum heap memory to over 4GB based on the available RAM.

The ApJServVMTimeout in jserv.conf is used to specify the amount of time allocated for the JVM to startup or shutdown ,this value should be sufficient to ensure thata garbage collector finishs its job.

An improper of an insufficient JVM allocation often results in java errors like the java.lang.OutOfMemoryError and java.lang.NoClassDefFoundError

In autoconfig enabled Oracle Applications systems the configuration and behavior of JVM can be maintained thought the context file. These can be changed though the Oracle Applications Manager or by using the context editor.

You can also get a summary of the Jserv usage from OAM by using the Jserv Usage Summary screen from OAM.

You can also use JConsole a utility provided by Sun Microsystems to have a graphical real time monitoring of your JVM usage.

The following article provides details on using jconsole.

http://java.sun.com/developer/technicalArticles/J2SE/jconsole.html

Additionally in oracle applications the jVM usage is catorgorised in the following groups

OACoreGroup This is the core group for handeling Java requests
DiscoGroup Ths is the JVM groups reserverd for your Discoverer requests
FormsGroup This is the JVM that is used in case you have configured your forms server to run in servlet mode
XmlSvcsGroup This is the JVM that is used for your XML services like XML gateway.

You can increase the number of JVMs for each of these groups through OAM. Each of these JVM will listen on a TCP port from the port range specified in the java.sh file.

You can check the status of your jvm though

http://[host][domain]:[port]/servlets/IsItWorking or by using Oracle Diagnostics

Wednesday, September 13, 2006

AD Admin


Continuing our discussions on ad utilities today i will discuss about the most commonly used ad utility adadmin. Adadmin is a utility that performs a number of tasks required from maintaing and administering an Oracle Applications instance.

On a broad level the tasks performed by adadmin can be categorized into database activities and Applications filesystem management tasks.

In addition to these, adadmin in 11.5.10 onwards you can use adadmin to put the system in Maintenance Mode also. Maintenance mode is special mode introducted to facilitate maintenance tasks like patch application.

Before you run adadmin you must ensure the following.

Set your applications environment
Ensure that you have sufficient space in tmp disk.
For certain adadmin task you may require to shutdown your concurrent managers

You can run adadmin by typing adadmin at the command pront afdter seeting the environment.

$adadmin

At the time of execution adadmin prompts you to verify and enter several information pertaining to your applications installation like APPL_TOP location ,ORACLE_HOME.adadmin log file name,batch size etc.

Adadmin can also be run in a non interactive mode. This is accomplished by creating a defaults file.The defaults file must be place at the location $APPL_TOP/admin/[sid]/

You can create the defaults file with the following syntax

$adadmin deafultsfile=$APPL_TOP/admin/[sid]/samtask.txt

Next time you can run adadmin for the same task by specifying the interactive=no option.

adadmin \
defaultsfile=APPL_TOP/admin/vis/samtask.txt \
logfile=adadmin_091306.log workers=9 \
interactive=no

If your previous session of adadmin had encountred with problems adadmin promts you to either continue with your old session or start with a frest session as show below

Your previous AD Administration session did not run to completion.
Do you wish to continue with your previous AD Administration session [Yes] ?


The main menu of adadmin presents you with the following six choices

AD Administration Main Menu
--------------------------------------------------

1. Generate Applications Files menu

2. Maintain Applications Files menu

3. Compile/Reload Applications Database Entities menu

4. Maintain Applications Database Entities menu

5. Change Maintenance Mode

6. Exit AD Administration

First two options are related to maintaining applicvations file system the second twop options relate to database activities ,the fifth option here is used to put the system in maintenance mode and bring it back from maintenance mode.


Under the Generate Applications Files Menu you can perform the following tasks

Generate Applications Files
----------------------------------------

1. Generate message files

2. Generate form files

3. Generate report files

4. Generate graphics files

5. Generate product JAR files

6. Return to Main Menu


Under the Maintain Applications Files menu you can perform the following tasks

Maintain Applications Files
----------------------------------------

1. Relink Applications programs

2. Create Applications environment file

3. Copy files to destinations

4. Convert character set

5. Maintain snapshot information

6. Check for missing files

7. Return to Main Menu


Under the Compile/Reload Applications Database Entities menu you can perform the following tasks

Compile/Reload Applications Database Entities
---------------------------------------------------

1. Compile APPS schema

2. Compile menu information

3. Compile flexfields

4. Reload JAR files to database

5. Return to Main Menu


Under the Maintain Applications Database Entities menu you can perform the following tasks

Maintain Applications Database Entities
---------------------------------------------------

1. Validate APPS schema

2. Re-create grants and synonyms for APPS schema

3. Maintain multi-lingual tables

4. Check DUAL table

5. Maintain Multiple Reporting Currencies schema

6. Return to Main Menu

Under the Change Maintenance Mode you can do the following

Change Maintenance Mode
----------------------------------------

Maintenance Mode is currently: [Disabled].


Maintenance mode should normally be enabled when patching
Oracle Applications and disabled when users are logged on
to the system. See the Oracle Applications Maintenance
Utilities manual for more information about maintenance mode.


Please select an option:

1. Enable Maintenance Mode

2. Disable Maintenance Mode

3. Return to Main Menu

If you noitice the message this menu selection also shows the maintenance status (disabled in our case) of the system.

You can also forcefully exit adadmin at any point of time by typing 'abort',This will however result in a unclean exit of adadmin and the next time when you run adadmin you will be prompted with the option to start fresh or continue with the previous session as described earlier

To know more about the individual tasks performed by admin refer to the 'Maintaining Oracle Applications Documentation Set' at the applications documentation library.

Tuesday, September 12, 2006

Autoconfig

An Oracle Applications instance has its configuration details that are stored and used in multiple files. Managing these configurations manually would have been a night mare without autoconfig. My friends who have worked with 11.0.3 and earlier versions would understand the pain better than anyone else. Though in 11.0.3 the number of configuration files were numbered and could be tracked with a little effort.

But not so in the case of 11i.Thankfully we have autoconfig to do up the messy job for us now.

Autoconfig is a utility which is shipped with the latest releases of Oracle Applications that manages all the configuration files in oracle Applications.

Autoconfig has been defined by oracle 'as a tool which that simplifies and standardizes configuration management tasks in an Oracle Applications environment'.

But where does autoconfig get the configuration information from? For this autoconfig relies on a file called the context file.

The context file is an XML file in the format [sid]_[hostname].xml.This xml file stores all the configuration details of your oracle applications system like the web port number, database names etc.

There are separate context files for the database tier and the applications tier.

The [context_name] variable used here is an equivalent of [sid]_[hostname]

The location of the context file on the application tier is

$APPL_TOP/admin/[context_name].xml

The location of the context file for the databse tier is

$ORACLE_HOME/appsutil/[context_name].xml

Additionally if the applications is spread across multiple nodes each node will have its separate context file.

Autoconfig reads the information that is present in theses context files and updates the corresponding configuration files like appsweb.cfg, jserv.conf to name a couple.

But how do these context files get the information from? in previous versions of Oracle Applications we had a utility called the context editor which was used to update the context files. This has now been replaced by the Oracle Applications Manager.

Context files should now be edited only through OAM and never manually.

In case the context file is lost, you can regenerate your context file using the adbldxml.pl script

Once a particular context value is updated in OAM and saved, the changes are not propagated across the configuration files till you run autoconfig.

Apart form the context file autoconfig also makes use of the template files. Each configuration files that is going to be updated by autoconfig had a corresponding template file. Autoconfig compares the value from the context file with the template file before writing into the corresponding configuration file.

Driver files are also used by autoconfig, the driver files contain specific commands that may be required to be executed to update certain values at the database level.

Autoconfig is run by executing the shell script adautocfg.sh which in turn calls for the adconfig.sh which calls the perl script adconfig.pl.

The applications environment must be set before executing autoconfig, also since autoconfig will require a connection to your database you must ensure that the database and listener is up before running autoconfig.

Autoconfig is enabled in all latest releases of 11i,in case you want to implement autoconfig to an earlier 11i instance you can follow the instructions given in metalink note 165195.1

Monday, September 11, 2006

Oracle Applications File System.

A proper understanding of the file system that Oracle Applications implements is critical for efficiently working with and managing Oracle Applications.

The below discussion only a brief overview of the Applications file system and directory structures and does not include shared application tier file system.

The final structure your application file system takes depends upon the input parameters that you give while executing rapidinstall, it is carried across multiple nodes with the help of the config.txt which stores these parameters.

The [dbname] in this blog refer to your database name and generally the SID of your database which is also specified at the time of executing rapidinstall for installing oracle applications.

Since the installation start with the DB node first we will first talk about the DB Tier.

On the DB tier there two main top level directories which are [dbname]DATA and [dbname]DB.

The [dbname]DATA is also reffred as the DATA_TOP contains all the datafiles (.dbf) for the various tablespaces of your database. These include your System tablespace, Applications Tablespace, Temporary table Space etc. All the datafiles must reside within the DATA_TOP.It is however possible to have multiple DATA_TOPs within a Oracle Applications Instance, this is
particularly useful for spreading across your datafiles across multiple mount points or disks.

The second important top level directory of the database tier is [dbname]DB. This contains your 9i ORACLE_HOME (as in the case of 11.5.10).That is under this directory all the files need to run and maintain you database reside.any database upgrade like upgrading your applications database to 10g would involve upgrading this ORACLE_HOME.

Coming to the Applications Tier there are three important top level directories.

[dbname]APPL,[dbname]COMN and [dbname]ORA

The [dbname]APPL is also know as your APPL_TOP. The APPL_TOP contains the core technology files required for Oracle Applications it also contains individual subdirectories for all oracle applications products. For eg under the [dbname]APPL or the APPL_TOP you would find directories for AD,FND,GL etc. These product directories are also know as PRODUCT_TOPs like AD_TOP,GL_TOP etc. Each of the product directories have the sub directories like admin, driver, import, odf, sql, bin, forms,reports etc.

The second TOP level directory under the applications tier is the [dbname]COMN. This is also referred to as your COMMON_TOP.The

COMMON_TOP contains files that are commonly used by different Oracle applications products as well as any third party applications that may have been integrated with Oracle applications.

The COMMON_TOP contains sub following sub directories.
  • admin which holds the place for concurrent manager log and out files in the log and out sub directories respectively. Also it contains a scripts subdirectory.
  • html which is also referred by the environment variable OA_HTML contains the HTML files, JSP,CSS and Java scripts that are used by Oracle Applications.
  • java subdirectory which holds the jar files, this is also referred to as the JAVA_TOP.
  • scripts subdirectory that contains the machine admin scripts like the adstpall.sh
  • util subdirectory contains third party utilities that are used in oracle applications like JRE from sun microsystems
  • Temp subdirectory used for caching
  • Portal subdirectory used to delivery rapid install portal pages.

The third top level directory under application tier is the [dbname]ORA directory.This contains the IAS ORACLE HOME and the 8.0.6 ORACLE HOME.

Apart from the Database ORACLE_HOME 11i uses two other ORACLE_HOMES.The first is the 8.0.6 ORACLE HOME.This is used for developer 6i products which are forms reports and graphics. The applications executables also link with the 8.0.6 libraries.

IAS ORACLE HOME is the ORACLE HOME used by the 9iAS application server which is the primary web server for Oracle Applications.

Friday, September 08, 2006

Oracle Diagnostics.

Oracle diagnostics is one of the tools that aim at achieving enhanced supportability for your Oracle Applications instance.

Oracle diagnostics provides a series of predefined test that can be run against your ebusiness suite to determine any performance or configuration bottlenecks. The diagnostics tests are divided into various categories ranging form technical and functional areas. Separate test groups are created for each application with oracle applications like General Ledger, Applications DBA etc. For each product the tests are further categorized into problem areas like installation issues, data issues customizations etc.

A periodic execution of these test is recommended by oracle to check the sanity of your Oracle Applications instance over a period of time.

Oracle diagnostics test are mostly written in JSP,JAVA or PLS/SQL with the user interface mostly being web based in the form of HTML or JSP.(Though there is also a command line interface available).

The web based interface for Oracle diagnostics can either be launched from Oracle Applications Manager or via the CRM administrators console (http:///OA_HTML/jtflogin.jsp).

The web base interface can be launched either as standalone HTML user via the URL http://:/OA_HTML/jtfqalgn.htm or as an administrative -level user through the CRM administrators console or Oracle Applications Manager Console.

The command line interface can be used by the following command

java -DJTFDBCFILE= -Dframework.Logging.system.filename=
-Dservice.Logging.common.filename= oracle.apps.jtf.regress.qatool.QAConsole

Apart from the predefined test Oracle diagnostics also allows for creating custom test and unit test cases. You can also create most of these test using user Interface also that is without any coding involved.

Oracle diagnostics tools are come as a product within Oracle Applications with the product name IZU. In case your Oracle Applications instances does not have this product, you must first install this product using AD Splicer.

The results of the diagnostics test can be viewed as a report in a web based user interface for a particular diagnostics test session. This output can be saved to the local PC and uploaded to metalink for further support. The diagnostics test results and the associated statistics are also available at the database level in the following tables JTF_DIAGNOSTIC_LOG and JTF_DIAGNOSTIC_STATS.

Further you can also use Oracle Applications Manager to schedule automatic execution of diagnostics tests.

Since the results of the diagnostics test might contain potentially sensitive data segregated diagnostic roles are available to restrict the type of test available to a particular user. Diagnostic roles include Super User, Application User, End User and Anonymous user.

The latest release of Oracle diagnostics is 2.4,once you have installed/available IZU in Oracle Applications you can apply the latest Oracle diagnostics 2.4 test using adpatch. However its important to note that Oracle Diagnostics can be installed only on systems 11.5.4 and higher. Also JDK 1.3.1 or higher is recommend to use oracle diagnostics.

This current version of Oracle diagnostics tools are launched directly within Oracle applications. Once you have completed the installation of Oracle diagnostics you can assign the seeded responsibility 'Oracle Diagnostics Tool' to any valid ebusiness suite user.

You can refer to metalink note 358831.1 for details instructions on doing this.

Complete reference on Oracle Diagnostics is also available in the Oracle Applications Supportability Guide in the applications documentation CD.

Tuesday, September 05, 2006

XML Gateway

It feels good to be back in business that is back to blogging. A huge backlog of mails kept me occupied yesterday, today i will talk briefly about Oracle XML Gateway as component of Oracle Applications. This is only indented to be a conceptual introduction and for the complete details you must refer to the user guide or appropriate metalink note.

XML Gateway is a tool that facilitates the communication between the Oracle E business suite and third party applications or trading partners in the form of well formatted XML messages.

XML Gateway ensures that both business to business (B2B) and Application to Application(A2A) requirements are met. Further XML Gateway ensures that the messages that are generated or consumed are compliant with the standards set by the Open
Applications Group. You can find more information on these standards at http://www.openapplications.org

Oracle XML Gateway works with Oracle Workflow to consume events raised and generate XML messages. These messages are further propagated using Oracle Advanced queuing technology and Oracle Transport agent(OTA).

Inbound and outbound messages are managed in queue table using Oracle Advanced Queuing.

The OTA is used to deliver messages to a trading partner over HTTP or HTTPs. An OTA servlet running with Oracle Applications is also responsible for receiving inbound documents sent by the trading partner.

Oracle XML gateway can be considered as a form of EDI, whereas in a normal EDI transaction the operation happens in a batch in case of XML gateway the message are more real time as they are based of events.

Oracle XML gateway makes use of the uses Web Services Description Language (WSDL) to facilitate trading partners to communicate with Oracle Applications. Trading partners can use third party web service tools to call the web services publish by your Oracle Applications.

It also uses the Java Messaging Service(JMS) to send messages between Oracle Applications and trading partners.

At the core of Oracle XML Gateway lies the execution engine, this is responsible for interacting with other oracle technologies like Oracle Workflow etc to consume and generate messages between trading partners as in the case of a B2B communication.

Oracle XML Gateway supports the SMTP, HTTP, HTTPS, JMS transport protocols for message delivery and consumption.

Oracle XML Gateway uses the Message Designer to define message maps, message maps are required to specify the data source and data target for the document. You can also use Map creation wizards that are provided for this purpose.

The message designer and wizard is a client software which is required to be installed separately on the client PCs.

Message map files have a .xgm extension. Message maps that are created on the loacle /client system have to be loaded to the middle tier APPL_TOP.

The java LoadMap and java DeleteMap are used to load and delet message maps on the middle tier server.

Its important to note that before you crate your message maps for your document you must ensure that the document conforms to the Document Type Definition(DTD).Pre defined DTD are installed and loaded in the $APPLTOP of the middle Tier. You can however load custom DTD that you can define using the Oracle Message Designer to the middle tier as well as modify existing DTD and delete existing DTD.

The DTD files are created with the .dtd extension.

The java DeleteDTDFromClob and java LoadDTDToClob are used for deleting and loading DTDs respectively.For complete syntax and example to load and delet DTDs refer to the Oracle XML Gateway users guide.

You can use the Oracle Applications responsibility 'XML Gateway Responsibility' to define trading partners and transactions.

In releases 11.5.7 onwards XML gateway is distributed as a part of AOL and does not require to be licensed or installed separately. For prior releases XML Gateway can be installed by applying patch 2440710.

The metalink note 152775.1 contains full instructions for installing and configuring Oracle XML Gateway.

You can verify your XML gateway installation byu executing the following sql script

SQL> $ECX_TOP/patch/115/sql/ECXTEST.sql

this will create a OUTnnn.xml if the installation and configuration of XML Gateway is successful.

Friday, August 25, 2006

Notice:

I am travelling to europe on business so i wont be blogging next week,will resume once back.

Sam

Ad Relink

Continuing my series on the AD Utilities in todays post i will blog about AD Relink.

AD Relink is a utility that is used to Oracle Applications Executables the Oracle8 Server product libraries contained within the Oracle Applications Technology Stack ORACLE_HOME.

In other words AD Relink is used to regenerate an Oracle Applications executable using the Oracle Applications Tech Stack libriries.

A unique feature of AD relink is that it is not a executable like other Ad utilities it is in fact a shell script that uses the UNIX 'make' command. In windows environment therefore its important to have MKS Toolkit or CYGWIN in the path before using AD Relink.It does this by reading the product definition from the {prod}.mk file. This file is located at PROD_TOP/lib location. AD Relink will fail in case the files are missing, courupted or a newer version of the file is required.

Relinking may be required under various scenarios like an executable getting corrupt or lost. Relinking is also recommended after cloning upgrades and patching. But mostly Auto Patch will take care of the relinking process at the end of the patching.

The following is the syntax for AD Relink

adrelink.sh force={y | n} [optionalargs]

Force here is used to specify wether to relink regardless of the status of the library or object files.

Optional Args include back_mode used to specify to backup the executable before relinking.
The values for this are 'all','file'(backs up the executables metioned in the adrelinkbk.txt,this is also the default value) and 'none'.

Eg: adrelink.sh force=y “ad adpatch”

AD Relink is run after logging into the system as the 'applmgr' user and setting the environment.
The following environment variables must be set properly before using AD Relink
PATH, ORACLE_HOME,APPL_TOP, ORACLE_SID or TWO_TASK, LD_LIBRARY_PATH, and SHLIB_PATH (HP specific)

Also you must use AD Relink to relink only AD executables to relink other executables it is recommended to used ADADMIN instead. Eg if you wish to Relink your FNDLIBR (Your concurrent Manager executable) you should use adadmin and choose the 'Maintain Applications Files' option, though you could do the same with AD Relink also.

By default AD Relink creates a log file of the actions performed and the errors encounterd in the linking process at the location from where the AD Relink command was run.

It is recommended that you shutdown services of the tier for whose executables you are relinking.

You cannot relink non Oracle Applications executable using AD Relink for that you must use the make command manually.
eg: make -f ins_rdbms.mk install.

Thursday, August 24, 2006

AD Splicer

Oracle Applications provides quite a few utilities which are aimed at effective maintenance and monitoring an Oracle Applications instance. In my next posts i will talk about these UNIX utilities which are also referred to as AD utilities.

Today i used AD Splicer so i will start with this one.

AD Splicer is a utility used to add an off-cycle product into Oracle Applications.

Products which have been released between the base releases of 11i are referred to an off-cycle product. Once AD Splicer is used to splice these off-cycle products into Oracle Applications they are recognized by other AD utilities like AD Patch as a valid Oracle Applications product for a given release.

In a multi node environment adsplicer should be used on all the APPL_TOPs.It is recommended to run AD Splice on the Admin node first.

Before using AD Splice you are required to add the new tablespace for the new products that are going to be added. In case you have migrated to the Oracle Applications new tablespace model you would require to create a new tablespace APPS_TS_TOOLs manually before using AD Splicer.

Ad Splicer makes use of the following control files to add the new off-cycle product into oracle applications.

[prod]prod.txt : This is a product definition file which contains the language independent information about the product.

[prod]terr.txt : This is also a product definition file containing language-specific information about the new product.

Both these product definition files should not be edited manually.

For example the product definition files for the off-cycle product Web ADI are bneterr.txt and bneprod.txt

newprods.txt : This file is also know as the product configuration file. You can edit this file optionally. This file acts as a template for configuring the new product that would be added. It comprises of a list of parameters which include

product- The product being added eg.bne .This must not be changed.

base_product_top - This is the base path where the files for the new product will be places using the Oracle applications filesystem architecture. the default value for this is APPL_TOP.

oracle_schema - This parameter refer to the oracle schema which is the owner of the new product to be added.

sizing_factor - The sizing factor which is to be followed for table and index creation.

main_tspace - The tablespace for product tables

index_tspace - The tablespace for product indexes

temp_tspace - The tablespace for Oracle schema’s temporary segments

default_tspace - This refers to the default table space for the of the Oracle Schema owning the product.

All the above mentioned control files namely the prod.txt,terr.txt and newprods.txt must be placed in $APPL_TOP/admin so that adsplce is able to read them.

Like other Ad utilities AD Splice will also require to make a connection to your database instance using SYSTEM and APPLSYS accounts as a result your database and listener must be running while using AD Splice.

An important fact to note is that products that are added through AD Splice are visible to other AD Utilites except autoupgrade.

The metalink Note 76708.1 contains further details and instructions on using AD Splice.

Monday, August 21, 2006

Oracle Jinitiator

Oracle Applications is based upon a thin client architecture. On the desktop Tier you need almost nothing.. Well almost, it does require a certified web browser and the Oracle Jinitiator.

Oracle Jinitiator is a software that provides the JVM to run oracle form based products which run in the form of a form client applet.The oracle Jinitiator uses its own JVM instead of the browsers JVM.It is isntalled as a plugin ( as in the case of mozilla, Netscape or firefox) or as an Active X component (in case of Internet Explorer).

When Oracle Applications is accessed for the first time from a client PC the Jinitiator is downloaded and installed on the client PC.It is not used for Self Service Web Applications, The JInitiator is invoked only upon clicking a form based application.

After Jinitiator is installed it downloads the form client applet along with the commonly used JAR files, this is done to reduce the network traffic to download JAR files form the server every time.

Jinitiator also performs JAR caching, applet caching and incremental JAR loading to improve applications performance.
These JAR files are commonly stored under the users profile directory with a folder named Oracle Jar Cache.

The Oracle Jinitiator executable is stored on the location $OA_HTML/oajinit.exe

Oracle Jinitiator allows only trusted JAR files to run within its JVM. This trust is established by using digital signatures. In the current version of Oracle Applications the JAR files are automatically signed with the digital signatures during the install of Oracle Applications using rapidwiz. However you can still change your digital signature and repackageyour oajinit.exe for security reasons.

During the installation process rapidwiz automatically creates a file in the applmgr user $HOME directory called identitydb.obj, this file has a reference to the SID of the database instance.

If there is a mismatch between this file on the server and that on the clinet PC it often results in the yellow bar problem.

The folowing files are created automatically by rapidwiz in the current version of Oracle Applications

$APPL_TOP/admin/appltop.cer

$APPL_TOP/admin/adsign.txt

$HOME(applmgr)/identitydb.obj

To create a new digital certificate you can use the adjkey command, while the adjbuild.sh is used to repackage your jinitiator exe.You can also regenerate your JAR files using ADADMIN.

A Jinitiator package should typically contain the certificate and the obj file along with the executable.

In previous versions of Oracle Applications (earlier to 11.5.9) an unsigned JAR file would result in a yellow bar problem, but in the current release of Oracle Application attempting to load a forms with an unsigned JAR file would fail with an a java security exception error.

The latest certified versions of Oracle Jinitiator is 1.3.1.26 to run with Oracle E-business Suite 11.5.10, the least certified version is 1.1.8.16 which is used with release 11, though you can use version 1.1.8.X to access your 11i applications it is recommended that you upgrade your Jinitiator to the latest supported version 1.3.1.X.

You can follow the metalink note id 124606.1 to upgrade your Jinitiator.

An important fact to remember is that any patch applied through adpatch which contains JAR files, these new JAR files are not signed with the digital signature, after the patch is applied adpatch will regenerate all the JAR files and these new JAR files will be signed and trusted to run within the Jinitiator.

To see a list of supported browsers that are certified to access E-Business Suite reffer to metalink Note id 285218.1.


Thursday, August 17, 2006

11i.ATG_PF.H Rollup 4

A ATG Rollup Patch (RUP) is released approximately twice every year. It includes the fixes that have been successfully tested and included in the ATG RUP, till it is frozen for release.

Oracle Applications Technology 11i.ATG_PF.H Rollup 4 has now been released.

ATG_PF.H Rollup 4 is cumulative and contains all the fixes included in 11i.ATG_PF.H Rollup 3 and 11i.ATG_PF.H Rollup 3 contained all the fixes that were included in CU2,which included all fixes of CU1.
So in case you have missed out of any of the consolidated updates (CU1 & CU2) or the ATG_PF.H Rollup 3 here is your chance to catch up.

11i.ATG_PF.H Rollup 4 can be applied only to a 11i instance with 11i.ATG_PF.H. 11i.ATG_PF.H comes with the base installation of 11.5.10, so in case you want to apply this rollup to any instance of Oracle Applications 11.5.9 or earlier you must first upgrade to 11i.ATG_PF.H and then apply 11i.ATG_PF.H Rollup 4

The following products are changed or affect by the current RUP

  • Oracle Alert
  • Oracle Applications Framework
  • Oracle Workflow
  • Oracle Application Object Library
  • Oracle XML Gateway

The Oracle Applications Technology 11i.ATG_PF.H Rollup 4 also includes Patch 5107107 - TXK (FND & ADX) AUTOCONFIG ROLLUP PATCH N released AUGUST this year.

Its important that in case you have implemented Single Sign On using 10g As and OID you must not apply this path but wait for the ATG 11.5.10 RUP4 SSO 10g Integration Patch (4775907) due for release late august.

For SSL configurations you must run the script txkrun.pl -script=InstSSLFix also included within this patch.

Other post installation tasks include upgrading your Oracle XML Parser for Java to v9.0.4 and creating additional tablespace APPS_TS_TOOLS before you can use adsplicer to add any additional products, this is not required in case you have not migrated to Oracle Applications Tablespace model.

Metalink note 365228.1 contains details about the 11i.ATG_PF.H Rollup 4 and instructions to apply the same.

Wednesday, August 16, 2006

XML Publisher

One of the good things that were introduced in 11.5.10 was XML publisher (XDO).Though you can install XML publisher with any version of 11i after applying the require pre requisite patches, it comes bundled with 11.5.10 version of Oracle Applications onwards.

XML publisher is a java based tool which uses data definitions and templates to generate a output of a report in a desired format such as in PDF. It is based on the W3C Extensible Style sheet Language (XSL) and uses XSLFO to convert data into a formatting object. A strong feature of the XML publisher is that it allows extensive customization of Oracle Applications reports by making use of templates without requiring high level of technical skills.

You can install XML publisher during the Oracle Applications (11.5.10) installation or register the product later on using license manager through Oracle Applications Manager (OAM).

In case your oracle Applications release is 11.5.9 or earlier you must follow the steps stated in metalink note id 278727.1 to install XML Publisher.

The XML publisher also comes with a desktop component. Two main components of the XML publisher desktop component are template builder and template viewer.

The template builder can be integrated with desktop tools like word. Once installed, you get additional features to automate the process of template creation like generation of SQL etc.

The XML publisher essentially comprises of the following modules

Data Definition-The XML engine acts as a single point to fulfill all reporting needs for an organization.

Data Layout/Templates-Templates and the final layout are managed within the XML publisher using a Template Manager, these can be customized using desktop tools like MS Word, excel or Adobe Acrobat. The template manager is also responsible for registering your new templates before they can be used with XML publisher.

Translation - The XML publisher uses the translation handler to do the required translation at runtime. It can also convert the output into a XLIFF format which can be used by 3rd party translation companies.

Delivery - The delivery manager is responsible to deliver the output to different destinations like printers,EDI,email etc. The delivery manager also provides flexibility by delivering the same output to different destinations like HTML format can be sent to email while a PDF format sent to the printer.

XML publisher allows conditional formatting of the output by using XSL or XSL:FO code. Additionally XML publisher can also be used to perform b2b communication by using the XML Data Engine.

As i stated before the XML publisher can also be used to generate output that can be used for EDI or EFT (Electronic Funds Transfer).To use this feature you must use a eText template. These templates are comprised of a series of tables which contain commands and data field definitions.

If you have applied the consolidated update 1 or above you can generate the output using XML publisher through the concurrent request directly by selecting the appropriate template in the concurrent program definition. Incase you have not applied the CU 1 you must first run the concurrent request to generate the XML report and then run a concurrent request to publish the request.

The behavior of XML publisher can be controlled through a set f properties, these properties can be set through the XML publisher administrator interface or you can use the XML publisher properties file xdo.cfg. This file can be located at /resource or alternately at JRE_TOP>/jre/lib.

To check weather XML publisher is installed or not you can query the FND_PRODUCT_INSTALLATIONS table or you can lookup the reports in Oracle Applications Manager. You can find out the version for your XML publisher from the output of your report or from MetaInfo.class file.

$OA_JAVA/oracle/apps/xdo/common/MetaInfo.class.

Friday, August 11, 2006

Oracle Applications Manager.

The Oracle Applications Manager(OAM) provides a console to effectively manage, monitor, configure and troubleshoot an Oracle Applications environment.
The console is HTML based and as such does not require any additional software excpet the browser.
One of the key features of OAM is the Applications Dashboard which provides information on E-Business Suite installation,including summaries of current status, performance, critical activities, diagnostics, business flows, and security.

In Oracle Applications Manager 2.1.1, there are three System Administrator type responsibilities to use when accessing Oracle Applications Manager.
These Oracle Applications responsibilities are:
System Administrator - this responsibility has access to all functionality in OAM.
OAM Read Only Mode - this responsibility provides administrators with view-only access to most of the data in OAM. This responsibility does not provide access to critical actions such as Stop Services and Edit Configuration Parameters.
OAM Patch History - administrators with this responsibility can view the Applications Dashboard and Patch History pages.

The OAM is also used in conjunction with autoconfig for making changes to the application and DB tier context files.

OAM also provides advanced configuration wizards that allow you to perform advanced configurations to your E-Business Suite like SSL /SSL Accelerator conversion, Forms Listener servlet configuration and Apache Jserv load balancing.

OAM provides for a in depth monitoring of your Oracle Applications environment.OAM can also be used to monitor your forms listener servlet if you have configured your forms listener to run as a servlet.

You can also get detailed view of the Oracle Applications technology stack components like jserv memory usage, database connection pool details etc.

Additionally OAM can also be used to monitor your concurrent manager and concurrent requests.

In my first post i had talked about Generic Service Management(GSM), in case you have implemented generic service management you can monitor and control your different Oracle Applications services through OAM.

OAM also provides various features that aid in patch management process. There are various patch reports like applied patches which give details of the patches applied along with the timing reports and the changes they have made to the file system. This is a feature that i am sure DBAs who have worked on releases prior to 11i would surely appreciate.

Also included in the latest version of OAM after features like patch wizard and support cart which can be used with metalink services and aid in resolving service requests.

Cloning is also supported from OAM, currently though you cannot perform merging APPL_TOPS(Multi Node to single node cloning) from OAM.

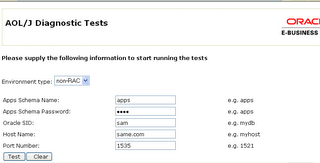
Oracle Diagnostics can also be run from OAM. Oracle Diagnostics enables testing, identifying and reporting functional problems through a web-interface. This tool allows invoking test cases interactively using custom input values or through batch modeusing pre-registered input values.

For more details on Oracle Diagnostics, please see Metalink Note: 262006.1

You can also extend the functionality of OAM by using your custom SQL scripts to run with Oracle Applications Manager.

You can use OAM with any version of Oracle Applications 11i starting form 11.5.1. The latest version of OAM is 2.1.1 whichcan be obtained by applying Oracle Applications Manager Mini-pack 11i.OAM.H.However if you have already applied 11i.ATG_PF.H,11i.FND.H or on Oracle Applications 11.5.10 or higher you do not need to explicitly apply the 11i.OAM.H mini pack.

The metalink note 258330.1 contains details on this pack.

If you are installing OAM from the patch you can either configure it manually by editing the zone.properties and jserv.properties or by using autoconfig.

The metalink note 201703.1 contains details on installing and configuring OAM.

After you have configured OAM it is important that you set your DISPLAY environment variable correctly in your jserv.properties file to enable all the graphs within OAM to be displayed correctly.

Example: wrapper.env=DISPLAY=myacme:0.0

Once OAM has been installed you can acees it from either the Oracle Applications sign on page, from any user with the system administration responsibility or from the following URL http://host:port/servlets/weboam/oam/oamLogin

Wednesday, August 09, 2006

OracleAS Web Cache

Delevring a content rich site always involves a tradeoff with performace.Oracle AS Web Cache aims to significantlly reduce this tradeoff.

The aim of my current post is give a brief introduction into the faetaures and capabalities of OracleAS Web Cache.

OracleAS Web Cache improves performance of complex applications. Web caching moves frequently used content closer to the user, reducing page building tasks from the application server therby decreasing page load times.

Another feature of OracleAS Web Cache is that it provieds for caching of both static and dynamic web pages allowing scaling of applictions that are planned to be deployed.The dynamic content caching is achived as OracleAS Web Cache employes an advanced validation machanisam to maintain consistency with origin data sources like file systems,content management tools,content feeds and databases.This is further achived as Oracle As Web Cache supports ESI standards. ESI stands for Eege Side Includes which is an open specification for a simple markup language that enables dynamic page fragmentation, caching, and assembly. It improves the performance and reduces the cost of dynamic content creation.
More information on ESI can be found at http://www.esi.org/

Additionally OracleAS Web Cache allows HTTP and HTTPS content caching.Also Oracle As Webcache allows session related caching rules (which is maintatining session tracking without compromiosing on the caching) and Multi version cahing rules(Caching multiple versions for the same URL)

To make use of Oracle AS Web Cacheing you must upgarde your Oracle Applications to use Oracle Appliction Applications Server 9.0.2, the latest certified version however is 10gAS.

OracleAs Web Cache acn also be used to implment a reverse proxy in typical DMZ configurations.Wehn a user sends a request to the Web Cache via the load balanceer or DNS server the web cacahe sneds the request to the application server if it cannot find a chached page for the request,however if it does find a cached page the web cache will deliver the same directly to the browser.

You can also implemet Web Cache Clustering by configuring multiple instances of OracleAS Web Cache.These provide for a failover in case one of the Web Cache cluster member fails.The cache cluster members poll the failed Web cache server for its current status until it is reachable again.Apart from failover cache clustering also aloow to cache extra content by disturbuting the cache load across multiple Web Caches.OracleAS Web Cache uses the relative capacity of each cache to automatically distribute ownership of objects among the cache cluster members.

OracleAS Web Cache can also be used to do load balancing for Oracle Applications. It provides for Stateless Load Balancing and Stateful (Session Binding) Load balancing.

You can specify the Web Cache to compress both cachable and non cachable objects,in such a scenerio the web cache will compress the opbeject based on the object type and the browser type.It uses the GZIP algorithm for this purpose.

You can also go through the OracleAS 10g Web Cache FAQ available through metalink.

Due to the extensive deployment of OracleAS Web Cache it is essential for us to secure our Web Cache. Currently OracleAs web Cache security can be implemented using Restricted Adfministration,SSL and SSL Accleration.
Reffer to Securing OracleAS Web Cache for more information.

Monday, August 07, 2006

NLS/MLS in Oracle Applications.

With the globalization of business the NLS/MLS feature in Oracle Applications has come into use quite extensively.

NLS (National Language Support) refers to the ability to run an Oracle Applications instance in any one of the supported languages other than American English.

This includes the user Interface that is the customer facing forms reports etc.

The base langue (that’s is the underlying logic for the instance)continues to remain American English, though this can also be changed.

MLS (Multi Language Support)should not be confused to be different from NLS it is infact an extension of NLS. MLS refers to the ability to run a single instance of Oracle Applications in more than one supported language apart for the American English.

MLS enabled applications store the seeded data in both the base language and the translated language.

Also most applications with Oracle Applications are MLS supported.

You can check the base and installed languages of your oracle Applications by querying the table FND_LANGUAGES.

Your base language will be represented with the 'B' flag and other installed language with 'I' Flag.

>SELECT LANGUAGE_SHORT_NAME, INSTALLED_FLAG
FROM FND_LANGUAGES

Before implementing NLS/MLS it is important to make sure that your database character set will support your additional language.


The metalink note 333785.1 contains a table of all the supported languages and the langues that are planned to be supported along with their supported database character sets.

If you are implementing multiple languages or planning to install additional languages you can choose UTF8 as your database character set.

You can install the additional language during the installation of Oracle Applications (in this case you would have to stage the NLS software along with the Oracle Applications Software) or you can add an additional language after you have setup and installed Oracle Applications. You should must however apply translations for any paths that you may have applied after the installation of Oracle Applications and before the implementation of the additional language.

If you are installing the language after the installation of Oracle Applications it includes a series of steps starting from Licensing your language, updating your multilingual tables and using auto patch to install the NLS patch.

NLS release notes for 11.5.10.2(215868.1) contains the details steps of installing additional languages

At the database level once NLS/MLS is implemented Oracle Applications stores language specific attributes in a separate table know as the translation table, where as the language independent attributes are stored in the base table. As a result it is important to consider additional space requirements as far as the database sizing is considered before implementing NLS/MLS

Oracle Applications currently does not support the uninstalling of the languages once they are installed. You can manually update the FND_LANGUAGES table, though this method is also not supported by Oracle.

To print from Oracle Applications while using UTF8 to support NLS/MLS you must use PASTA (FNDPSTAX) utility which is shipped with Oracle Applications. This uses the pasta.cfg file for various print options.The file is located at $FND_TOP/resource.

There are various seed printer drivers that can used with PSATA printing like PASTA_LANDSCAPE, PASTA_PORTRAIT, PASTA_LANDWIDE and PASTA_DYNAMIC.

When applying patches on an NLS/MLS environment you must first apply the base language patch immediately followed by the translation patches of the other installed languages.